
Table of Contents
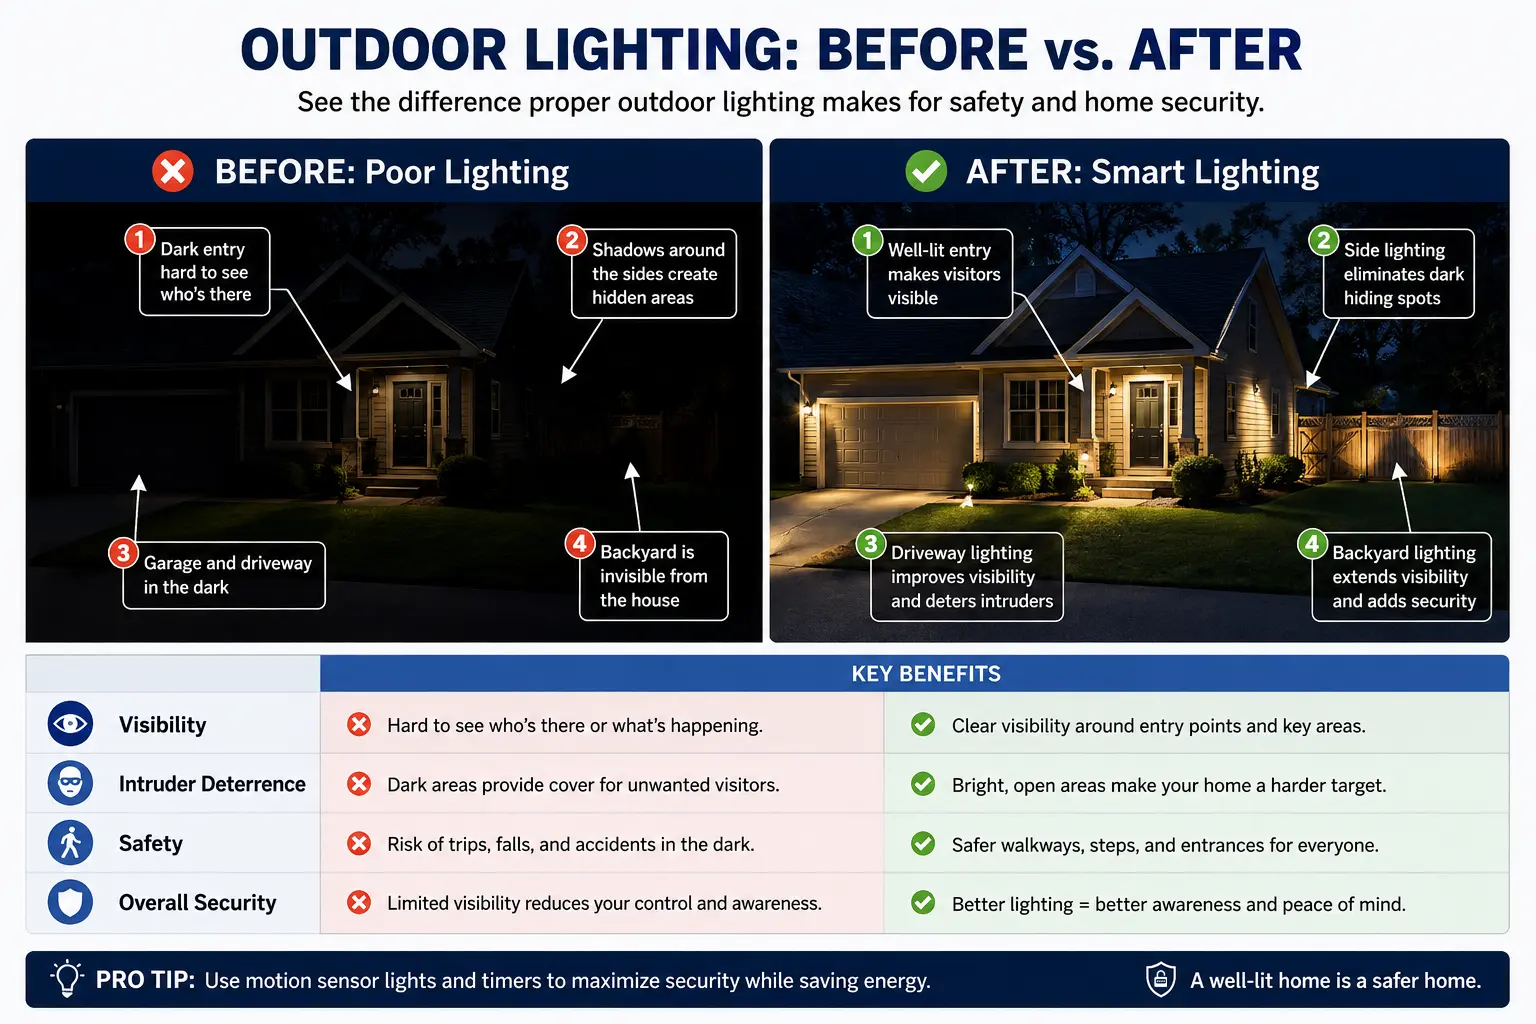
Quick Answer: Outdoor security lighting works best when it covers entry doors, garages, side yards, walkways, gates, and other approach routes without creating harsh glare or deep shadows. Use lower, steady lighting where people normally walk and brighter motion-activated lighting where unexpected movement should get attention, then aim lights so they help your cameras instead of shining into them. One of the biggest mistakes is not necessarily choosing the wrong fixture, but putting a good light in the wrong place, and I’ll show you the placement checks I would make first from a former locksmith’s perspective.
Outdoor lighting can improve security, but brighter is not automatically better.
The goal is not to turn your backyard into a stadium. Good outdoor security lighting should help you see someone approaching your home, remove dark areas around important entry points, make walkways safer, and give security cameras enough usable light to capture what is actually happening.
I spent almost five years working as a locksmith and earned the Certified Registered Locksmith designation through Associated Locksmiths of America. From that perspective, I consider lighting a supporting layer of home security. A bright front porch does not fix a weak deadbolt or damaged door frame, but good lighting can make the approach to that door far more visible.
The best setup combines good lighting with strong physical security.
Start With the Property, Not the Light Fixture
Before buying anything, walk around your home after dark.
Do it with the lights set the way you normally use them. Do not turn everything on just for the inspection.
Look at your home from the street, driveway, backyard, and both side yards. Pay particular attention to:
- Exterior doors
- Garage doors
- Ground-level windows
- Gates
- Narrow side yards
- Basement entrances
- Decks and patios
- Sliding glass doors
- Sheds and detached garages
- Walkways and stairs
- Places covered by security cameras
You are looking for two things: places people naturally need to walk and places someone could approach without being easily noticed.
That is where your lighting should do the most work.
Pro Tip: Do this inspection at night rather than trying to imagine what the property looks like from inside the house. Stand outside and look back toward your doors and windows. Landscaping, fences, corners, rooflines, and even parked vehicles can create dark areas that are not obvious during the day.
Where Should Outdoor Security Lights Be Placed?
If you are starting from scratch, I would prioritize lighting in roughly this order.
Exterior Doors
Front, back, side, basement, and garage-to-yard entrances all deserve attention.
The goal is not only to illuminate the lock itself. You want enough coverage to see someone approaching the door before they are standing directly against it.
Your front entrance may already have a porch light, but back and side doors are often where lighting gets overlooked.
Lighting is only one part of protecting these openings. My Door and Window Security guide covers the locks, frames, strike plates, windows, and other physical security issues that lighting cannot solve.
Garage and Driveway
A garage or driveway is usually a good location for a wider motion-activated light because the coverage area is larger.
Aim the fixture downward into the area you actually want to see rather than straight toward the street.
If the motion sensor constantly reacts to passing vehicles, pedestrians, or your neighbor pulling into their driveway, you will eventually become annoyed enough to reduce the sensitivity or turn the feature off entirely.
That defeats the purpose.
Side Yards and Gates
These are some of the easiest areas to forget.
A narrow side yard may have no reason to be brightly illuminated all night, which makes it a good candidate for a motion-activated fixture.
Pay particular attention to gates that provide access to a backyard or side entrance.
Back Patios and Sliding Doors
Patios are another area where lighting can serve several purposes at once. It improves normal use of the space, increases visibility around the rear of the home, and can help cameras monitor the approach to a sliding door.
If a sliding glass door is part of that area, lighting should supplement physical protection rather than replace it. I cover the lock, track, anti-lift protection, and glass itself in my guide to securing sliding glass doors.
Walkways, Steps, and Stairs
These areas usually need a different kind of lighting.
Instead of a powerful floodlight, lower-output path or step lighting can help people see where they are walking without creating glare.
This is one place where security and everyday safety overlap nicely. A well-lit path helps visitors find the entrance while also removing a dark route toward the home.
Sheds and Detached Buildings
A shed may contain lawn equipment, tools, bicycles, or other expensive items while also being one of the darkest parts of the property.
If running electrical wiring would be difficult, this is where a good solar motion light can make a lot of sense.
Areas Covered by Cameras
Every important camera location should be checked after dark.
Lighting should illuminate the area the camera is watching, not shine directly into the lens.
A security camera pointed toward a powerful floodlight may produce plenty of light and terrible footage at the same time.
| Area | Lighting to Consider First | Main Goal | Common Mistake |
|---|---|---|---|
| Front door | Porch or wall light, optional motion boost | Faces, visitors, packages | Light behind the visitor creating poor camera exposure |
| Back or side door | Motion or hybrid lighting | Visible approach | Lighting only the door itself |
| Garage or driveway | Adjustable motion floodlight | Wide-area visibility | Sensor aimed toward the street |
| Side yard or gate | Motion light | Reveal unexpected movement | Forgetting the area completely |
| Walkway or steps | Low-level path or step lights | Safe movement | Using unnecessarily bright floods |
| Patio or sliding door | Motion or low-level plus motion | Approach visibility | Glare reflected from glass |
| Shed or outbuilding | Solar or wired motion light | Remote-area visibility | Installing solar panels in heavy shade |
| Camera zone | Carefully aimed supplemental light | Better nighttime footage | Light shining directly into the camera |
Former Locksmith’s Tip: Light the approach, not just the door. If you can see only the person once they are already standing at the door, your lighting is doing less than it could. Think about the route someone must take to reach the door, window, garage, gate, or patio. I would rather have useful, even coverage of that approach than an extremely bright fixture aimed at one tiny area.
Motion Sensor vs. Dusk-to-Dawn Lighting
Both can be useful. They simply do different jobs.
| Lighting Type | Best Use | Advantages | Tradeoffs |
|---|---|---|---|
| Motion activated | Side yards, driveways, gates, rear entrances | Gets attention when movement occurs and does not stay on constantly | Poor adjustment can cause frequent false activations |
| Dusk-to-dawn | Porches, regular walkways, occupied areas | Consistent lighting throughout the night | Runs longer and can create unnecessary light if overly bright |
| Low-level plus motion boost | Entrances, driveways, camera zones | Normal visibility with brighter light when activity occurs | Requires a fixture or smart setup that supports it |
| Smart scheduled lighting | Porches, vacation routines, exterior accent lighting | Flexible schedules and automation | Depends on the device, network, and configuration |
| Manual lighting | Patios, work areas, occasional-use spaces | Simple and inexpensive | Provides no benefit when nobody remembers to turn it on |
For security, I particularly like motion lighting in places where movement is unusual after dark.
Someone walking up your front walkway at 7 p.m. may be completely normal. Someone moving through the gated side yard at 2 a.m. is a different situation.
Set Motion Sensors Carefully
Most outdoor motion sensor lights let you adjust detection sensitivity, duration, and sometimes the area being monitored.
Take the time to tune them.
Keep sensors from concentrating on busy streets, moving tree branches, dryer vents, HVAC equipment, and other places that can create unnecessary activations.
Whenever the fixture design allows it, detecting movement across the sensor’s field of view can often provide more reliable activation than having someone walk directly toward the sensor from a distance.
Follow the mounting-height recommendation from the manufacturer rather than assuming higher is always better.
Pro Tip: Do not stop testing after you can make the light turn on. Walk the routes you actually care about. Approach from the driveway, side gate, backyard, and other directions and see where the light activates. Then reduce unnecessary triggers until it responds to the movement that actually matters.
How Bright Should Outdoor Security Lighting Be?
Lumens tell you how much visible light a fixture produces. Watts tell you how much electricity it uses.
With modern LEDs, shopping by wattage alone is not very useful.
More lumens means more light, but that does not mean you should automatically buy the brightest fixture available.
The amount you need depends on:
- The size of the area
- Mounting height
- Beam width
- Fixture direction
- Nearby lighting
- Surface colors
- Landscaping
- What your cameras need
- How close neighboring homes are
A walkway needs far less light than a wide driveway.
A small porch does not need the same fixture as a large backyard.
The best way to judge brightness is by looking at the entire illuminated area rather than one impressive lumen number on the box.
You want enough light to recognize people, see obstacles, and remove problem shadows without creating a blinding hotspot.
Brighter Can Actually Be Worse
One of the most common outdoor lighting mistakes is assuming that maximum brightness equals maximum security.
A poorly aimed high-output fixture can create harsh glare and deep contrast between bright and dark areas. It can also shine into windows, bother neighbors, or make camera footage harder to use.
Aim exterior lighting down and toward the area that needs illumination.
Shielding is useful when it keeps light from escaping above the fixture or across property lines.
For normal residential use, warmer lighting around 2700K to 3000K is usually easier on the eyes and less intrusive than extremely cool blue-white lighting. There is rarely a reason to make every exterior fixture look like a commercial parking lot.
If you prefer brighter white light for a particular security or camera location, test that location rather than applying the same color temperature everywhere.
Wired vs. Solar Outdoor Security Lights
Power source matters almost as much as brightness.
Hardwired Lighting
If wiring already exists where you need the light, hardwired fixtures are usually my first choice for important areas.
They provide consistent power, can support higher-output fixtures, and do not depend on several hours of sunlight to recharge.
The disadvantage is obvious: adding wiring where none exists can make installation considerably more complicated.
Electrical work also needs to be done correctly. If you are not comfortable working with household electrical wiring, this is a good place to involve a qualified electrician.
Solar Lighting
Solar lights are extremely useful when the location is more important than having perfect power availability.
A shed, fence, gate, remote section of a backyard, or side of a detached garage can be difficult to wire and easy to cover with solar.
I have used VENSSTNOR solar motion flood lights at my own home for more than two years. I have one on my back shed and another near my patio to help illuminate the deck for my camera system.
One feature I particularly like is the split lighting design. Being able to aim separate sections of the light lets me spread the illumination where I actually want it instead of creating one bright spot.
I cover those lights in much more detail in my VENSSTNOR Solar Motion Flood Lights review.
Solar does have tradeoffs.
Charging performance depends on panel placement, available sunlight, weather, season, battery condition, and how frequently the light activates.
That makes solar excellent for many secondary locations, but I would not automatically use it everywhere simply because installation is easy.
Pro Tip: Before mounting a solar light permanently, watch the location for a full day. A spot that looks sunny when you install it at noon may spend most of the afternoon shaded by the house, trees, fencing, or another building.
Outdoor Lighting and Security Cameras Need to Work Together
This is one of the areas homeowners often discover only after everything is installed.
A light can help a camera tremendously, but it can also make the image worse.
The basic rule is simple: light the scene, not the lens.
Avoid mounting or aiming a strong fixture so the camera is staring directly into it.
Also watch for reflective surfaces. White siding, light-colored soffits, glass doors, vehicle license plates, snow, and other reflective surfaces can change how a camera handles nighttime lighting.
Video doorbells create another challenge because the visitor may be standing very close to both the camera and the porch lighting.
After changing any exterior lighting near a camera, review actual footage after dark.
Do not judge the setup only by what your eyes see.
My Home Security Camera Tips guide covers camera angles, blind spots, positioning, and nighttime coverage in more detail, while Video Doorbells 101 covers front-door camera placement and other considerations.
Pro Tip: Trigger the camera yourself. Walk toward it wearing normal clothing, approach from different directions, and review the recording afterward. Make sure you can see useful facial and clothing detail instead of only confirming that a person-shaped object was there.
Smart Outdoor Lighting Can Be Useful Without Getting Complicated
You do not need a fully automated smart home to benefit from smart lighting.
A few practical uses include:
- Automatically turning porch lights on at sunset
- Turning them off at sunrise
- Increasing brightness when motion is detected
- Coordinating lights and cameras
- Controlling lights while away
- Creating realistic lighting routines during vacations
For schedules, sunset-based automation is usually more convenient than choosing one fixed clock time because sunset changes throughout the year.
If you use lighting to help a home look occupied while traveling, combine it with the rest of your pre-trip security routine rather than relying on lighting alone. My Vacation Home Security Checklist covers those steps in detail.
Common Outdoor Security Lighting Mistakes
Lighting Only the Front of the House
The front entrance is important, but it may already be one of the most visible parts of the property.
Do not forget the back door, side yard, basement entrance, patio, garage, gates, and other routes that are less visible from the street.
Buying the Brightest Fixture Available
More output is not automatically more useful.
Poorly aimed lighting can create glare, unnecessary light spill, and extremely bright areas surrounded by darkness.
Pointing Motion Sensors Toward the Street
If every car or pedestrian activates the light, the sensor probably needs to be aimed or adjusted differently.
Ignoring Landscaping
Trees grow. Bushes fill out. Leaves move. Vines spread.
A setup that worked perfectly when installed in early spring may behave differently by midsummer.
Putting Solar Lights Wherever Installation Is Easy
The fixture location and solar-panel location both matter.
If the panel cannot get enough sunlight, even a good motion light will eventually become disappointing.
Assuming the Camera Looks Fine
Review the footage.
Camera sensors react to bright lights, dark shadows, reflections, and backlighting differently than your eyes do.
Never Checking the Lights Again
Outdoor equipment gets dirty.
Spiderwebs appear around fixtures and cameras. Branches grow into detection areas. Solar panels collect dust. Fixtures shift. Batteries age.
A quick inspection a few times each year can prevent many annoying problems.
A Simple Outdoor Security Lighting Plan
If I were evaluating a home from scratch, I would keep the process simple.
1. Walk the Property at Night
Identify dark entrances, travel routes, steps, gates, and camera blind spots.
2. Decide What Each Light Is Supposed to Do
Is it there for everyday navigation, general visibility, motion detection, camera support, or some combination?
3. Choose the Power Source
Use existing wired locations where practical. Consider solar or battery-powered options where wiring does not make sense.
4. Install and Aim the Light
Direct the light toward the area that needs coverage instead of simply pointing it outward.
5. Adjust Motion Detection
Test actual approach routes and eliminate unnecessary activations.
6. Check Your Cameras
Review nighttime recordings after the lighting is installed.
7. Walk the Property Again
Look for remaining dark areas, glare, light spilling onto neighboring property, and fixtures that are doing more than necessary.
That final walkthrough often tells you more than the specifications on the box ever will.
Final Thoughts
Outdoor security lighting does not need to be expensive or complicated.
Start with the areas that actually matter: exterior doors, garages, side yards, gates, walkways, patios, sheds, and the spaces your cameras monitor.
Then choose the right type of lighting for each job.
Some locations benefit from steady, lower-level illumination. Others are perfect for motion lights. Remote locations may be ideal for solar. Camera locations need especially careful aiming.
Most importantly, do not confuse brightness with good security.
A few well-placed lights that illuminate the right areas are far more useful than turning your entire yard into daylight.
Lighting is one layer. Strong doors and windows provide the physical barrier, cameras provide awareness and evidence, and good outdoor lighting helps you actually see what is happening around both.
Want to keep improving your home security? Explore more Home Security guides with practical tips, upgrades, and security advice.
Outdoor Security Lighting FAQs
Do outdoor security lights actually deter burglars?
Lighting cannot guarantee that someone will avoid a property, but it can make approaches and activity easier to see and reduce the privacy that darkness provides. It works best as part of a layered security setup that also includes good locks, visible sightlines, cameras, alarms, and normal neighborhood activity.
Should I leave my porch light on all night?
You can, but it is not always necessary. A dusk-to-dawn fixture, lower-output porch light, timer, or smart schedule can provide consistent entry lighting without using an extremely bright fixture all night. Motion lighting can then cover areas where you want a stronger response to activity.
Can animals trigger outdoor motion lights?
Yes. Depending on the sensor type and sensitivity, pets, wildlife, insects, moving vegetation, and other environmental conditions can trigger a motion light. Adjustable sensitivity and careful sensor placement can reduce unnecessary activations.
Will a motion sensor light detect someone through a window?
Do not count on it. Many common motion lights use passive infrared detection, and glass can interfere with the infrared energy the sensor is designed to detect. Install outdoor sensors so they monitor the outdoor area directly and follow the manufacturer’s instructions for the particular sensor.
Do solar motion lights work during winter?
They can, but performance may decrease when daylight hours are shorter, the panel receives less direct sunlight, snow covers the panel, or cold weather reduces battery performance. Panel placement becomes especially important if the light is being used in a location you consider security-sensitive.
Can outdoor lighting interfere with a neighbor's property?
Yes. An improperly aimed floodlight can shine into neighboring windows or across property lines. Aim lights downward, use shielding where appropriate, and check local ordinances or association rules if light trespass is a concern.
Can renters install outdoor security lighting?
Sometimes. Battery and solar lights may offer less permanent options than hardwired fixtures, but attaching equipment to siding, trim, fences, or other property can still require approval. Check your lease and get permission from the landlord or property manager before making permanent changes.
What weather rating should I look for on an outdoor security light?
Choose a fixture specifically approved for the location where it will be installed. A fixture protected beneath a covered porch faces different exposure than one mounted directly in rain and snow. Check the manufacturer’s wet-location or damp-location rating, electrical safety listing, and installation instructions rather than relying only on the word “outdoor” in the product description.
Good outdoor lighting can make your home safer, easier to navigate, and less inviting to unwanted visitors. If this guide was helpful, share it with someone who could use a few practical home security ideas.

Michael Kendrick
Director of IT and former Certified Registered Locksmith with 27 years in technology and cybersecurity. Practical, everyday guidance to help you protect everything from the locks on your doors to the logins on your accounts.
Keep Learning: More Security Guides
VENSSTNOR Solar Motion Flood Lights Review: 3+ Years Later
After more than three years on my shed and back porch, these VENSSTNOR solar motion flood lights are still bright, reliable, and low maintenance. Here’s how they’ve handled motion detection, Midwest
Home Security Camera Placement: Locations, Angles & Tips
Smart security camera placement is about capturing useful footage, not simply covering more area. Learn where to position cameras, improve viewing angles and night footage, reduce blind spots, and properly test
How to Secure Doors and Windows: A Former Locksmith’s Guide
Learn how to secure exterior doors, windows, sliding doors, and frames with practical advice from a former locksmith. This guide covers the upgrades that matter most, common mistakes to avoid, and