
Table of Contents
Quick Answer: Good home security camera placement should capture the way people approach your property, not just the door, driveway, or object you want to protect. Prioritize your main entrances and other likely approach paths, then make sure each camera is low enough to capture useful facial detail and has been tested after dark for glare and blind spots. One lesson that carries over well from my locksmith background is that the most useful view is often the path someone must take to reach an entry point, not a bird’s-eye view directly above the door.
A security camera can cover a huge section of your yard and still miss the one thing you actually needed to see.
That is the problem with thinking about cameras only in terms of coverage. A beautiful wide-angle view of the front yard may tell you that somebody walked toward the house, but if the camera is mounted too high, too far away, or pointed into a bright porch light, you may have very little useful detail when something happens.
The better approach is to decide what each camera needs to accomplish first. Then choose the location and angle that gives you that view.
Start With the Area, Activity, and Details You Need
Before drilling holes, running cable, or attaching mounts, walk around your property and decide what you actually need each camera to show. A camera meant to watch a large section of the yard has a different job than one positioned near a doorway where facial detail matters.
For most homes, it helps to think about what you need each camera to capture:
- The Area: Do you need a broader view showing where someone came from, where they went, and what part of the property they moved through?
- The Activity: Do you need to clearly see what someone is doing, such as approaching a door, handling a package, entering a gate, or interacting with a vehicle?
- The Details: Do you need a closer view that can capture useful details such as a face, clothing, a vehicle, or another identifying feature?
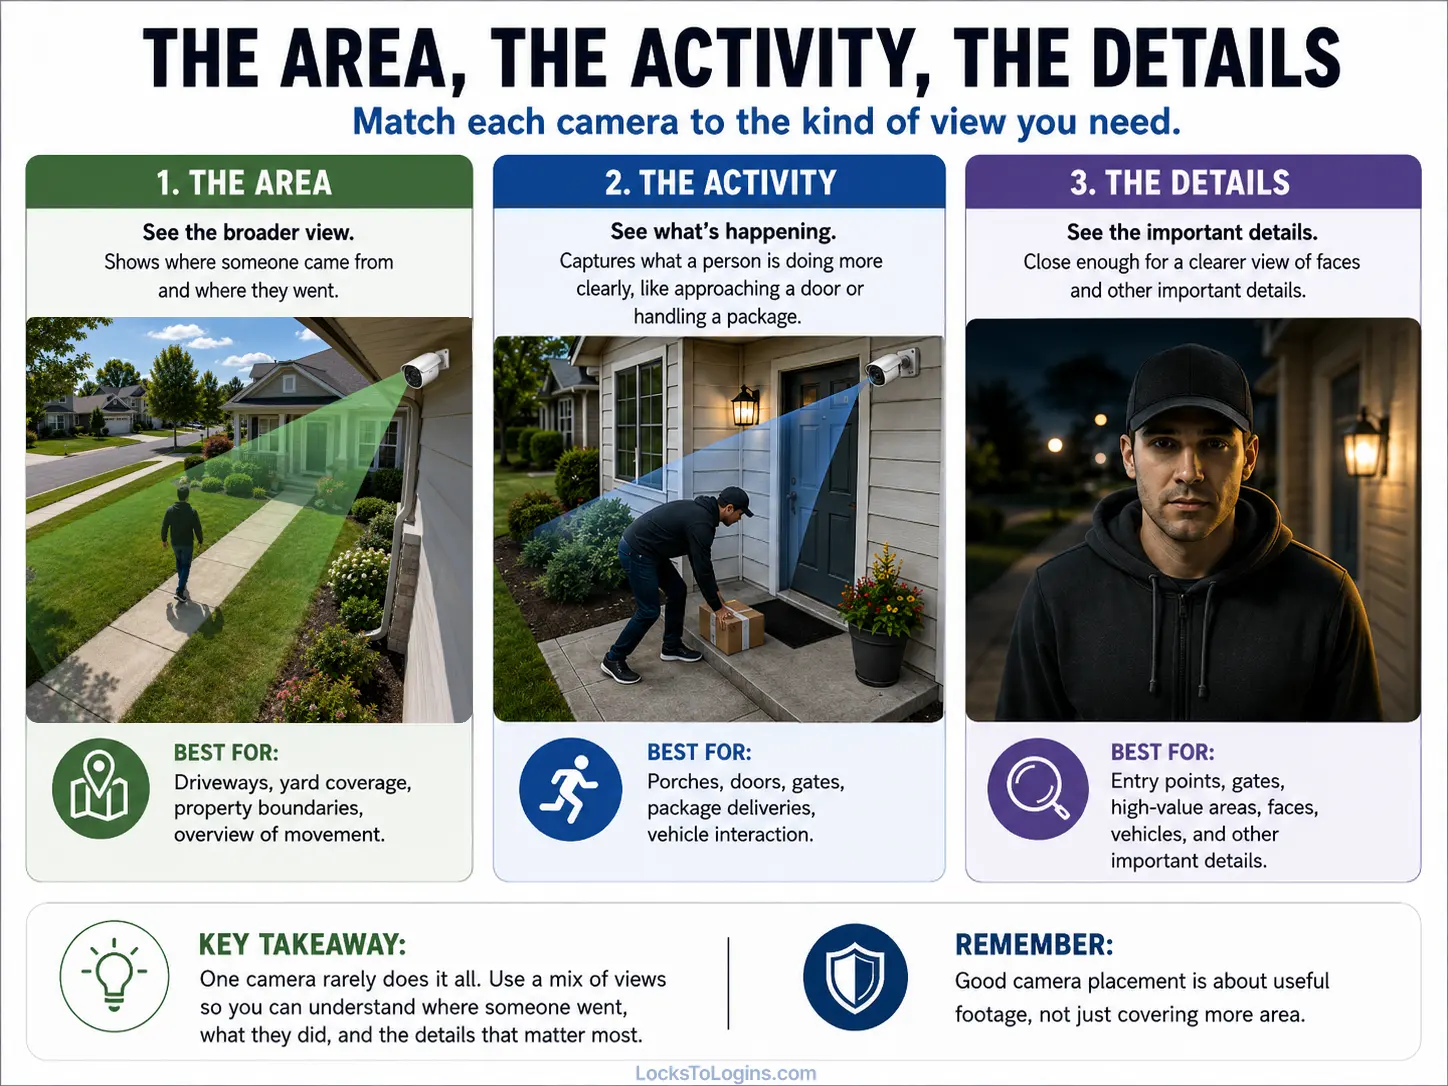
One camera does not always handle all three equally well. A wide driveway camera may give you an excellent view of the area, while a camera closer to a gate, walkway, or entrance can provide much better detail when someone approaches.
Pro Tip: Before mounting a camera, hold your phone roughly where the camera will sit and have someone walk the normal approach path. It will not perfectly reproduce the camera’s field of view, but it can quickly reveal whether you are looking at faces, the tops of heads, or the wrong part of the property.
Best Places to Put Home Security Cameras
Every house is different, so there is no universal layout that works everywhere. Start with the places people naturally have to pass through or approach.
Front Door and Main Entrance
The front entrance is usually one of the first locations worth covering because it handles visitors, deliveries, contractors, salespeople, and normal household traffic.
Do not automatically mount the camera directly over the center of the door. That position can work, but it can also create a steep downward view that shows more hair and hats than faces.
A camera slightly off to one side can sometimes provide a better angle as someone walks toward the entrance. Make sure you can see the person’s face before they are directly beneath the camera.
If packages are a concern, also check whether the camera sees the location where drivers normally leave them. A video doorbell can be particularly useful here because its lower mounting position often provides better facial and package views than a camera installed high under the roofline.
If package theft is a recurring concern, our package theft prevention guide covers additional ways to protect deliveries beyond simply recording the porch.
Back and Side Doors
Rear and side entrances deserve attention because they often have less natural visibility from the street or neighboring homes.
Look at the route someone would take to reach each door. A camera aimed across that path can often capture a useful face before the person reaches the entrance.
If a door sits inside a recessed porch, around a corner, or behind landscaping, make sure those features are not creating a hidden area just outside the camera’s view.
Former Locksmith’s Tip: Do not focus so tightly on the door that you forget the approach to it. Exterior doors naturally funnel people through predictable paths. From a security standpoint, seeing a person’s face several feet before they reach the door is usually more useful than a camera mounted directly overhead that records only the final second at the threshold.
Cameras are only one layer of protection around an entrance. If you are evaluating the actual doors, locks, frames, and windows too, see my door and window security guide.
Driveways and Garages
A driveway camera can help you monitor vehicles, deliveries, visitors, and activity around the garage. Position it so people walking toward the house remain large enough in the image to be useful.
Do not assume a camera that sees the entire street, driveway, front yard, and garage will also produce clear identifying detail everywhere in that picture. The wider the scene becomes, the fewer pixels are available for a distant person’s face.
Headlights are another issue. A camera facing directly toward incoming vehicles may look excellent during the day and struggle at night when bright headlights enter the frame.
If the garage has a separate service door, consider whether that entrance needs its own view rather than depending entirely on the driveway camera.
Side Yards, Gates, and Narrow Walkways
Side yards can be excellent camera locations because fences, gates, and narrow walkways often create natural choke points. Instead of trying to cover the entire side of the house, place the camera where someone has to pass through a predictable area.
A gate is especially useful because you can often angle the camera toward the approaching person rather than simply watching them from behind after they pass through it.
Accessible Windows and Patio Areas
You usually do not need a dedicated camera pointed at every single window.
Instead, look for accessible windows that share the same approach path. One well-placed corner camera may cover several windows, a patio door, and part of the backyard at the same time.
Pay extra attention to basement windows, windows facing alleys or concealed side yards, and areas hidden by decks, fencing, sheds, or landscaping.
How Many Security Cameras Do You Really Need?
There is no magic number. Start with the most important approach paths and add cameras only when you discover a meaningful gap.
| Number of Cameras | Good Starting Priority | What to Consider Next |
|---|---|---|
| 1 camera | Main entrance or primary approach | Choose the location where the most important activity occurs |
| 2 cameras | Main entrance plus rear entrance or driveway | Base the second location on your home's layout and weakest blind spot |
| 3 cameras | Front entrance, rear/side approach, driveway or garage | Check whether gates and concealed windows remain uncovered |
| 4 or more | Add side yards, secondary entrances, detached structures, or other specific gaps | Avoid adding cameras simply to create overlapping wide views that provide no new detail |
A smaller number of well-positioned cameras can be more useful than a large system installed without a plan.
Security Camera Height and Angles Matter
You will often see a recommended outdoor mounting height somewhere around seven to ten feet. That is a useful starting range for many residential cameras, but it should not become a rule that overrides what the camera actually sees.
The right height depends on:
- The camera’s field of view
- The distance to the walkway or entrance
- The height of the porch, garage, or eave
- Whether the camera is meant for overview or identification
- How easily someone could reach or tamper with it
A camera fifteen feet above a front door might be difficult to reach, but that does not make the footage useful. The closer someone gets to the house, the more the camera may end up looking straight down at them.
Aim Across the Approach When Possible
A slight downward angle is normally better than a steep one. Try to position the camera so a person moves toward or partly across the field of view with their face visible.
If the camera sees only someone’s back as they walk away, turn it around mentally and ask what the camera would have seen five or ten seconds earlier. That earlier position may be the better target.
Wide Angle Is Not Automatically Better
A wide field of view is great for situational awareness, but there is a tradeoff. The more area you squeeze into the image, the smaller distant people and objects become.
If identifying a person at a gate is important, a narrower view aimed at the gate may provide more useful detail than an extremely wide camera that sees the entire yard.
Pro Tip: Review a test recording with someone wearing a normal baseball cap or hood. A camera angle that looks fine when someone is staring directly up at it may lose most facial detail when that person is simply walking normally.
Lighting Can Make or Break Your Camera Footage
Daytime testing is only half the job.
After dark, a camera can run into glare, deep shadows, infrared reflections, motion lights, headlights, and bright porch fixtures that were not noticeable during installation.
Watch for:
- Floodlights shining directly into the camera
- Bright lights behind the person you are trying to see
- Infrared light reflecting from nearby siding, soffits, walls, or windows
- Spider webs close to infrared LEDs, which can glow brightly at night
- Headlights washing out driveway footage
- Dark areas beyond the camera’s effective night range
More light is not always better. You want usable, fairly even illumination in the area the camera needs to monitor.
Our Outdoor Lighting 101 guide goes deeper into security lighting placement and how to light entrances, side yards, driveways, and camera coverage areas without simply blasting the property with unnecessary light.
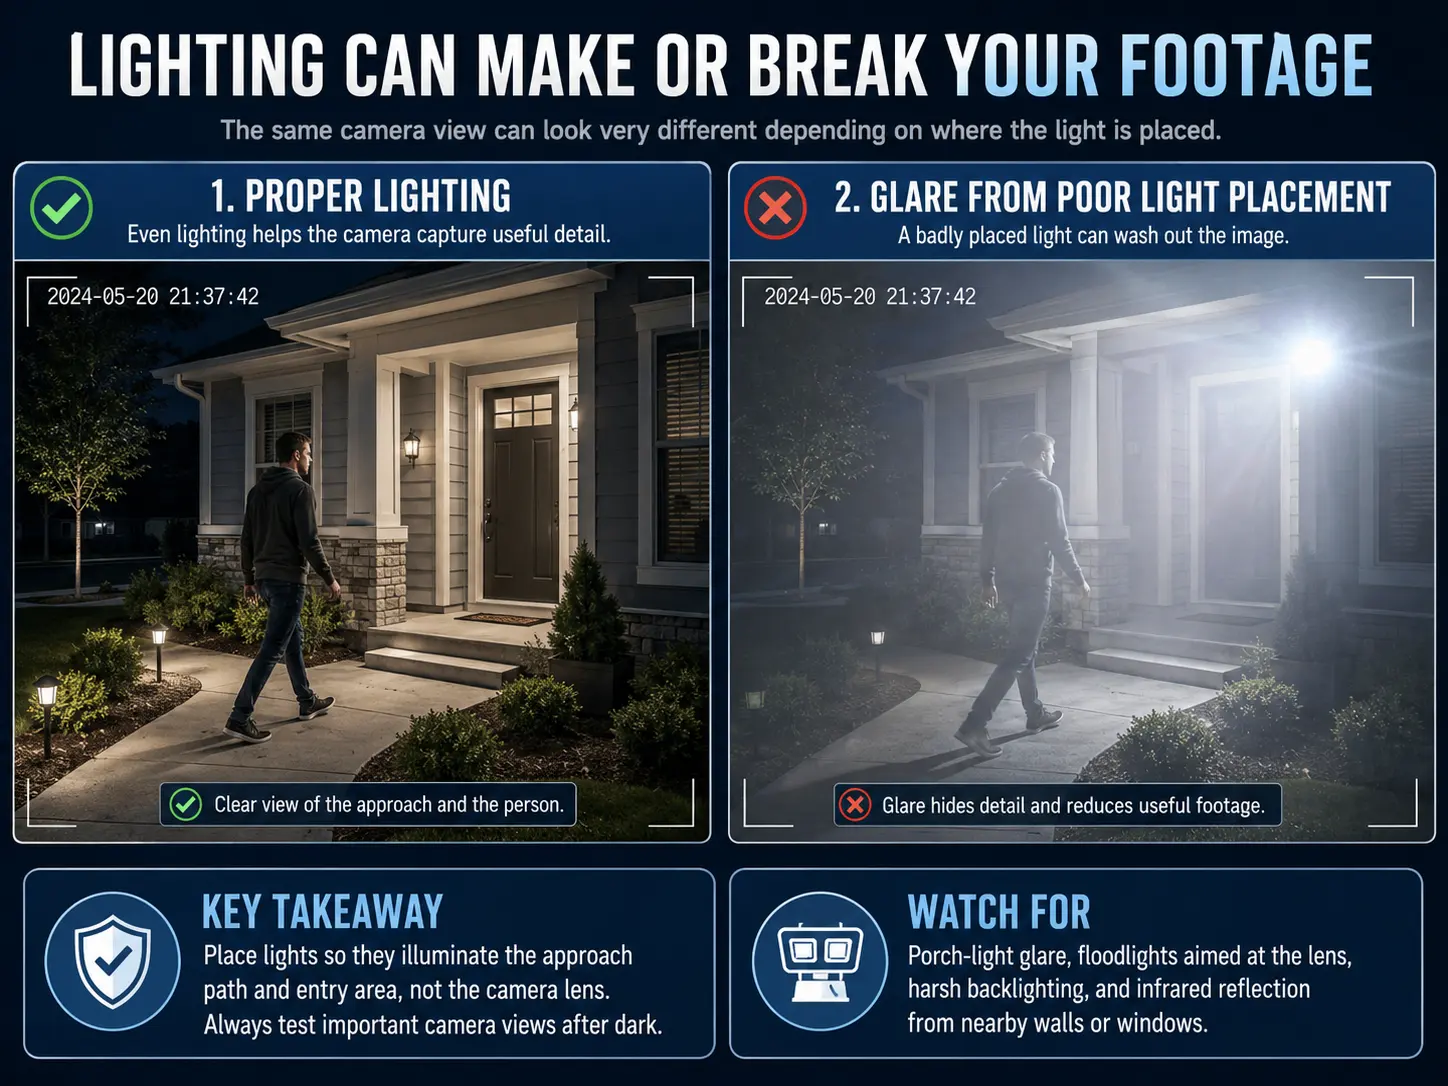
Pro Tip: Test every important outdoor camera after full darkness, then trigger any nearby motion lights while recording. A light that helps your eyes may still cause the camera to overexpose the exact area you need to see.
Check Wi-Fi, Power, and Weather Before You Mount Anything
A perfect camera angle is not very useful if the camera constantly loses its connection.
For Wi-Fi cameras, test the signal from the exact mounting area before drilling. Exterior walls, brick, stone, metal siding, garage doors, distance, and even where the router sits inside the house can affect performance.
Test with doors and windows closed, since that is how the camera will normally operate.
Battery-powered cameras also need to remain accessible enough to recharge or replace batteries without turning routine maintenance into a ladder expedition every few weeks.
For wired cameras, think through the cable path and weather protection before settling on the angle. Outdoor connections should be protected from water, snow, and physical damage, and the camera itself should be rated for the environment where it will be installed.
If your cameras depend on your home network, our Home Wi-Fi Security guide covers router security, updates, network settings, and other steps that can help keep connected devices reliable and protected.
Motion Zones and Alerts Are Part of Camera Placement
A camera that sends an alert every time a tree moves or a car passes three houses away eventually becomes a camera you stop paying attention to.
After choosing the physical position, adjust the detection zones so they match the reason the camera exists.
For example:
- A front-door camera may need the walkway and porch, but not the entire sidewalk.
- A driveway camera may need the driveway entrance and parked vehicles, but not every passing car.
- A backyard camera may need the gate and patio doors, but not tree branches swaying at the edge of the yard.
If your camera supports person, vehicle, animal, or package detection, test those features rather than assuming the default settings are right for your property.
The goal is not to eliminate every alert. It is to make the alerts useful enough that you still pay attention to them.
Indoor Security Cameras Are Optional
Indoor cameras are much more personal than outdoor cameras. Some people like having them. Other people find the idea uncomfortable. Both reactions are understandable.
A hallway or common-area camera can provide another view if someone gets past an exterior camera. Some homeowners use cameras to check on pets, valuables, or utility areas rather than for burglary protection at all.
I actually used one that way myself. After experiencing water backups during heavy rain, I aimed an indoor camera at the floor drain in my laundry room. When we traveled, I could check that drain from anywhere instead of spending the trip wondering what was happening in the basement.
It was not the use case most people picture when they hear “security camera,” but it solved a real problem.
If you use indoor cameras, be especially careful about privacy. Avoid bathrooms, bedrooms, guest sleeping areas, and other places where people reasonably expect privacy. Everyone living in the home should know where indoor cameras are located.
Audio recording deserves extra consideration because recording laws vary by jurisdiction. Review the laws that apply where you live before enabling microphones or recording conversations.
If you want to dig deeper into what connected cameras and other smart devices collect, see our guide to smart home device privacy.
Do Not Forget the Digital Security of the Camera
Internet-connected cameras are computers with lenses attached to them. Once they connect to your home network or a cloud service, physical placement is only part of the security equation.
The Federal Trade Commission recommends several basic protections for connected security cameras:
- Use a strong, unique password rather than a default or reused password
- Enable two-factor authentication when the camera account supports it
- Keep camera firmware and mobile apps updated
- Use an encrypted Wi-Fi network
- Review the camera’s encryption and security settings
- Consider separating cameras from computers and other important devices on your network when your equipment supports it
You can find the FTC’s complete guidance in How To Secure Your Home Security Cameras.
Your camera system is supposed to improve security. Weak passwords, abandoned firmware, or an exposed camera account should not create a new problem while solving another one.
Test the Entire Camera System Before You Call It Done
Do not stop after confirming that the live image looks good.
Walk through every important detection area yourself and verify:
- The camera sees your face as you approach
- Motion detection activates at the right time
- The notification reaches your phone
- The event is actually recorded
- You can play the recording back
- The date and time are correct
- Night footage is usable
- Wi-Fi or network connectivity remains stable
- Battery levels are healthy
- Storage has enough capacity
This is worth repeating after major landscaping changes, exterior renovations, moving lights, replacing a router, or changing camera settings.
Plants grow. Snow piles up. Patio furniture moves. Spider webs appear. A camera view that was perfect six months ago may no longer be perfect today.
Pro Tip: A working live view does not prove your alerts or recordings are working. Trigger each camera, wait for the notification, and then play back the saved event. You want to discover a recording problem while you are standing in your driveway, not while you are hundreds of miles from home.
If you are preparing to leave town, the camera checks are also included in our complete vacation home security checklist.
Common Security Camera Placement Mistakes
- Mounting cameras too high: You may gain a wider view while losing facial detail.
- Aiming only at the door: Capture the approach path before the person reaches the entrance.
- Trying to cover everything with one camera: A huge field of view can make important subjects too small.
- Ignoring nighttime lighting: Glare, infrared reflection, and headlights can completely change the image after dark.
- Mounting a camera behind glass: Indoor infrared cameras often reflect off the window at night and obscure the outdoor scene.
- Ignoring Wi-Fi before installation: A weak connection can cause delayed alerts, failed recordings, or unreliable live video.
- Forgetting seasonal changes: Leaves, snow, decorations, patio furniture, and landscaping can create new blind spots.
- Checking only the live view: Always test alerts, recording, playback, and storage too.
- Assuming digital zoom will fix missing detail: Zoom cannot recreate information that the camera never captured in the first place.
Final Thoughts
Home security camera placement is not about seeing every square foot of your property. It is about making sure the areas that matter most are covered well enough to give you useful information when something happens.
Start with the paths people naturally take toward your doors, driveway, garage, gates, and other vulnerable areas. Then check the camera height, viewing angle, lighting, Wi-Fi signal, motion detection, and actual recorded footage instead of assuming a good-looking live view means the job is done.
A few thoughtfully placed cameras that capture clear faces and useful activity will usually do more for you than a larger system full of wide views and blind spots. Take the time to test the system during the day and after dark, and revisit those views occasionally as lighting, landscaping, and your property change.
For more practical ways to strengthen your home, explore our Home Security guides covering doors, windows, lighting, cameras, and everyday security upgrades.
Home Security Camera FAQs
Do I need a security camera covering every window?
No. Start with approach paths rather than automatically dedicating one camera to every window. A properly positioned corner camera may cover several accessible windows, a patio door, and part of the yard at the same time. Give extra attention to concealed or easily accessible windows.
Should outdoor security cameras be visible or hidden?
Visible cameras can provide a deterrent and make it obvious that an area is monitored, while less-obvious cameras may be harder to tamper with or avoid. For most homes, a visible camera mounted out of easy reach is a practical choice. The quality of the view matters more than whether the camera is perfectly hidden.
Can I point a security camera at the street or sidewalk?
That depends on the camera’s field of view and the laws where you live. Try to focus the camera on your own property and the areas you actually need to monitor rather than unnecessarily recording neighboring private spaces. Audio recording can create additional legal considerations, so check your state and local rules.
Can a security camera record through a window?
It can during daylight, but nighttime performance is often a problem. Infrared LEDs can reflect from the glass and wash out the outdoor image. Reflections from indoor lights can cause similar issues. Mounting an outdoor-rated camera outside is usually better when dependable night footage matters.
Should I enable audio recording on my security cameras?
Only after considering whether you actually need it and checking the laws that apply where you live. Video and audio recording are not always treated the same way legally. If the microphone does not serve a useful purpose, leaving audio disabled can also reduce unnecessary privacy concerns.
Is one wide-angle security camera better than two narrower cameras?
Not necessarily. A wide camera can provide excellent overview coverage, but people farther from the lens may appear very small. Two cameras can sometimes do a better job by giving you one overview view and another closer identification view at an important entrance, gate, or walkway.
What is a simple method for planning security camera placement?
Start by deciding what you actually need each camera to capture. Think about the area, the activity, and the details: whether you need a broader view of where someone went, a clearer view of what they were doing, or enough detail to recognize a person, vehicle, or other important feature. Once you know the purpose of each camera, it becomes much easier to choose the right location, height, and viewing angle.
How often should I check my security camera placement?
Review important camera views at least a few times a year and after major landscaping, construction, lighting, router, or camera-setting changes. Seasonal growth, snow, decorations, spider webs, and moved furniture can all create new blind spots or affect night footage.
Good security camera placement can make a big difference in how useful your system is when something actually happens. If you know someone setting up or improving their cameras, share this guide to help them get better coverage from the start.

Michael Kendrick
Director of IT and former Certified Registered Locksmith with 27 years in technology and cybersecurity. Practical, everyday guidance to help you protect everything from the locks on your doors to the logins on your accounts.
Keep Learning: Related Security Guides
Outdoor Security Lighting: Placement, Types & Home Security Tips
Outdoor security lighting works best when it is placed strategically, not simply made brighter. Learn where to put motion lights, how to choose between wired and solar options, and how to
Video Doorbells 101: What to Know Before You Buy
Video doorbells can do much more than show you who is at the door, but the right model depends on your wiring, Wi-Fi, storage, subscriptions, and porch layout. This guide explains
Home Wi-Fi Security: 10 Steps to Lock Down Your Network (2026)
A few small changes can make a big difference in your Wi-Fi security. Learn how to protect your home network, boost performance, and keep cybercriminals out with these practical steps.